Let me tell you about the most challenging part of my guitar practice routine. I spend hours writing intricate little details to solos or harmonies, just to later find out they sound a bit rubbish when they’re layered over the chord progression I wrote earlier. This is where looper pedals, for me, come in handy.
But there’s lots of different layers to a looper pedal (no pun intended) that go way beyond just practicing, I’m sure you’ve seen other guitarists use them on stage and in videos, building intricate loops and textures right before your eyes. Looper pedals let you layer multiple tracks to create complex rhythms, harmonies, and soundscapes.
Whether you want to lay down a basic rhythm pattern or an ambient swell, looper pedals give you the ability to do this. But these tools take practice and experimentation to master.
So, why are Looper pedals so awesome? And why have they surged in popularity in recent years? Let’s get into it!
Key Takeaways
- Looper pedals let you layer tracks, making rhythms, harmonies, and soundscapes more complex and creative.
- Recording and looping your own playing can help to improve timing, technique, and improvisation.
- During live shows, looper pedals enable dynamic, layered performances that captivate audiences.
- Placing the looper in different spots in your signal chain affects the overall sound and application.
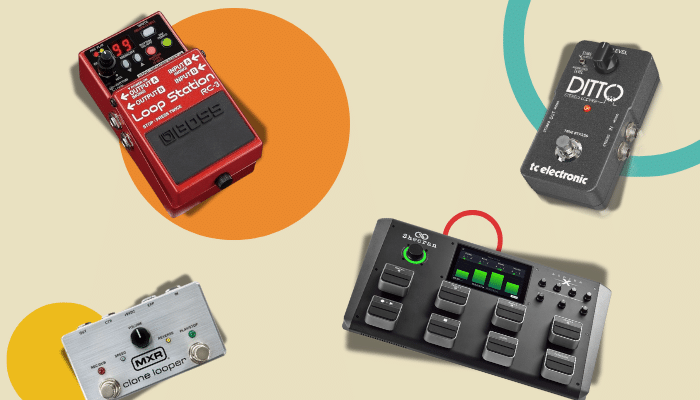
- Popular models include Boss RC-3 and Electro-Harmonix Nano Looper.
- Start simple, practice timing, and experiment with sounds.
What is a Looper Pedal?
A looper pedal records your guitar riffs, vocals, or chord progressions and plays them back to you in a continuous loop. This allows you to build a rich blend of sounds. It’s perfect for improvisation or creating complex arrangements.
One of the most exciting features of a looper pedal is overdubbing. This means you can add a second part and even more layers to the existing loop. Begin with a rhythm part, then layer a lead melody, harmonies, or percussive effects. The options are limitless, and you instantly (or after a bit of practice) become a one-person band, creating a fully layered musical masterpiece.
Looper pedals are designed for real-time use, making them invaluable during live performances. They can instantly record and replay loops, letting you create complex arrangements on the fly. This real-time layering can bring a new dimension to a solo performance and turn it into a dynamic, captivating, impressive show.
However, looper pedals are extremely versatile tools in other contexts as well.
For songwriters, they provide a platform to experiment with different layers and arrangements, making the creative process more fluid and intuitive.
For practice sessions, loopers offer a way to play along with your own recordings, helping to improve timing, technique, and improvisational skills.
I always use a looper when I’m trying to write a solo or new melodic part. I plug in, play my chord progression, and then noodle over the top – with headphones on, obviously.
The Benefits of Using a Looper Pedal for Guitarists
Looper pedals have grown in popularity over the past few years. Part of this is no doubt down to advances in digital technology, but also we’ve seen some famous artists (cheers, Ed Sheeran) using looper pedals regularly on stage. Here are some of the benefits of using a looper pedal.
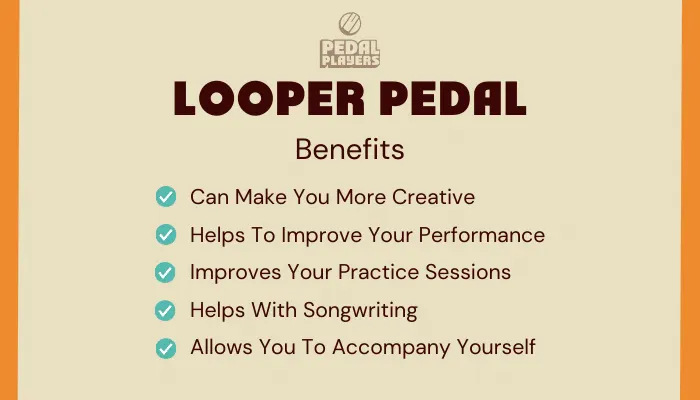
Can Make You More Creative
Looper pedals offer a world of versatility in crafting a wide range of sounds. With the ability to record and overdub multiple tracks, you can build complex rhythms, harmonies, and atmospheric textures.
Helps To Improve Your Performance
Looper pedals allow you to explore new creative avenues. You can craft ambient soundscapes, experiment with different sounds and layers, and push the boundaries of your playing.
Improves Your Practice Sessions
Looper pedals are excellent tools for practice. You can play along with your own loops, helping to improve your timing, technique, and improvisation skills. By listening to and playing over your recorded loops, you can identify areas for improvement and develop a more polished and cohesive playing style. This makes practice sessions more productive and enjoyable.
Helps With Songwriting
A looper pedal can be an invaluable tool for songwriting. It allows you to quickly capture musical ideas and experiment with different structures and arrangements. You can layer different parts to hear how they interact and make adjustments on the fly, streamlining the creative process.
Allows You To Accompany Yourself
For solo performers, a looper pedal acts as a musical partner. You can create your own backing tracks live, providing the accompaniment you need for solos and melodies. This adds a new musical layer to solo performances and is sure to make them more engaging and interesting.
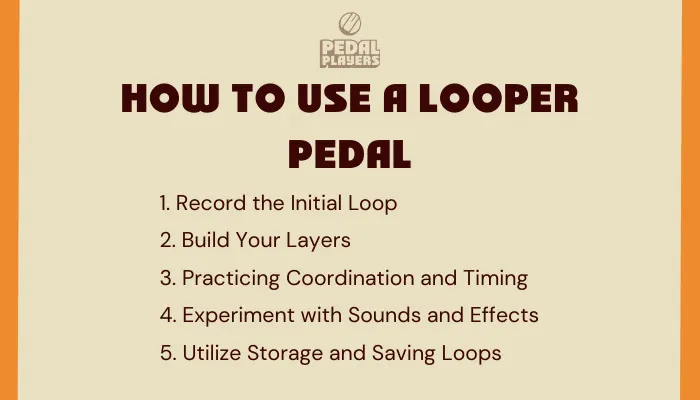
How to Use a Looper Pedal: Step-by-Step Guide
Using a looper pedal is a little tricky at first, but with a bit of practice, you’ll soon get used to it and be able to interweave it into your performance and practice sessions flawlessly. Here’s a step-by-step guide to help you get started:
Before we jump in, please note that pedals can vary, so your controls or functionality might be slightly different from what I describe here.
1. Record the Initial Loop
To create a loop, tap on the pedal at the beginning of your phrase to start recording and tap it again at the end to stop recording. The pedal will then continue playing the loop until you press stop. Begin with something simple, such as a basic rhythm or chord progression, to get the hang of the timing and coordination required.
2. Build Your Layers
After creating your initial loop, you can add to it by introducing additional tracks and effects. Think about adding a secondary layer with a melody, harmonies, or percussive sounds. Overdubbing enables the creation of complex, multi-layered textures.
Keep in mind that not every overdub needs to play from beginning to end; experiment with using shorter loops to achieve a call-and-response effect or to introduce variation.
3. Practicing Coordination and Timing
Looper pedals can be quite difficult to use, and using them effectively takes practice. So, don’t get disheartened if you don’t get it perfect straight away. Start with simple loops to develop your coordination and timing, then gradually work towards more complex arrangements.
Some looper pedals have built-in metronomes or preset drum beats that can help you keep to a consistent tempo. Alternatively, create your own beat by playing muted strings to set a rhythm.
4. Experiment with Sounds and Effects
Experiment with different sounds and layers to explore the full range of your pedal’s capabilities. Try varying the note ranges, adding effects like reverb or delay, and combining different musical elements. This experimentation can lead to discovering unique sounds and textures that enhance your music.
5. Utilize Storage and Saving Loops
Most basic loopers usually have enough storage for single loops with loads of overdubs. More advanced models have space for saving multiple loops, so you can store a setlist of backing tracks for gigs or save your compositions as you create them. This feature is especially useful for live performances and songwriting.
Master the Looper Pedal
Mastering a looper pedal takes a lot of practice and experimentation. Focus on timing and phrasing; don’t be afraid to explore the pedal’s full potential. The more you use it, the more you’ll unlock its capabilities.
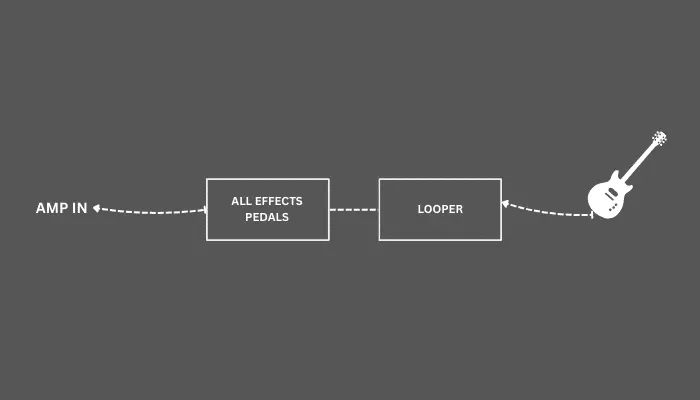
Where is the best place to put a looper in the signal chain?
Where you put your looper pedal in your signal chain can have a big effect on your overall tone and the types of effects you can apply. Here’s a detailed guide to help you decide the best spot for your looper pedal based on your needs:
1. At the Beginning of the Signal Chain
Placing your looper pedal at the beginning of your signal chain, right after your guitar, captures your dry, unprocessed guitar signal. This is a flexible position, as the looped signal can then be processed by all following effects pedals and your amplifier. This setup is ideal if you want to change the effects applied to the looped sound after it has been recorded.
2. After Drive Pedals
Another common placement is after overdrive, distortion, or fuzz pedals. This setup captures the overdriven or distorted tones in the loop. It ensures that the character of your drive effects is preserved in the recorded loop.
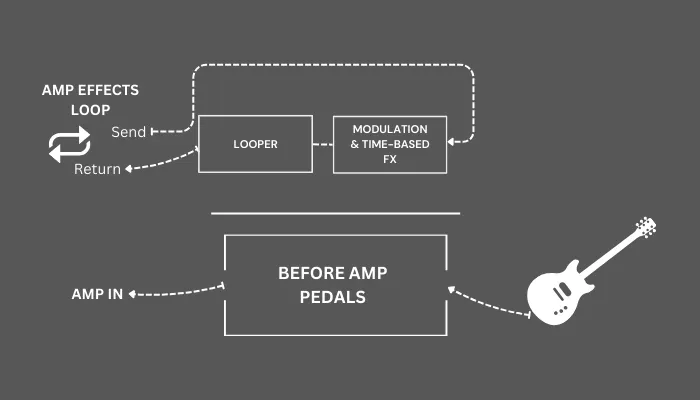
3. In the Effects Loop
An effects loop is a feature found in some amplifiers that allows you to insert effects pedals between the amplifier’s preamp and power amp sections. This is different from placing pedals directly between your guitar and the amp’s input.
When using the effects loop, the looper will still capture any effects used between the guitar and the amp input (such as overdrive, distortion, and delay). This is because the looper records the signal after it has passed through these pedals and the amplifier’s preamp section. This setup ensures that the character of your pre-input effects is preserved in the effects loop
Effects Loop: Looper On Its Own
If you put your looper straight in the effects loop with all your other pedals in front of the amp, it will record the signal, including these effects. But on playback, the recording won’t be modified by any pedals that were not on the loop recording. This is how I set up my looper when I’m practicing.

If you use your effects loop also for your modulation and time-based effects, then you have two main options for placing your looper pedal:
Effects Loop: Looper Before Modulation and Time-Based Effects
Placing the looper in the effects loop but before modulation (chorus, flanger, phaser) and time-based effects (delay, reverb) allows you to capture the preamp signal. Effects applied after the looper in the effects loop will not be recorded but will modify the loop during playback. This can be useful for changing the texture of your loop dynamically.

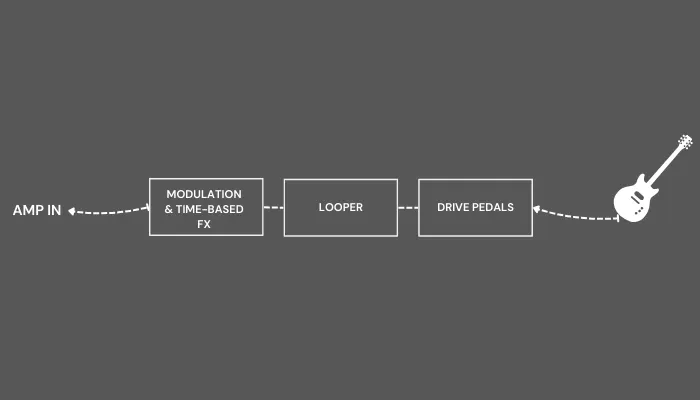
Effects Loop: Looper After Modulation and Time-Based Effects
If you place your looper pedal in the effects loop, but after your modulation and time-based effects, it will record the signal, including these effects. This setup allows you to capture a fully processed sound, including the amp’s preamp tone and the effects of the modulation and time-based pedals. This method is effective for creating complex, layered loops with consistent effect settings.