Have you ever found yourself deep in conversation about guitar effects with a bunch of pedal nerds? If so, flanger pedals have probably come up. This particular pedal is a bit of a polarizer — some guitarists swear by it, while others steer well clear. Personally, I’m firmly in the camp that loves the flanger.
Flanger pedals have enchanted many legendary guitarists, helping to create some of the most iconic riffs and solos in rock history (we’ll dive into those a bit later). Whether you’re playing rock, blues, metal, or any other genre, a flanger pedal can add that special touch to your guitar sound.
In this guide to flanger pedals, we’ll explore the fascinating world of flanger pedals. We’ll delve into their history, understand how they work, and discover how you can integrate them into your guitar tone to elevate your music.
What Is a Flanger Pedal?
A flanger pedal is a guitar effect pedal that adds a sweeping, whooshing sound to your tone. It enriches and thickens your guitar sound, making it more dynamic and textured. With a flanger pedal, your guitar can take on the roaring character of a jet plane taking off or a smooth, watery, waving texture. It’s a fantastic way to add excitement and depth to your usual sound.
Here’s an example of the classic flanger jet plane style swoosh.
How Flanger Works
Essentially, a flanger duplicates your guitar signal and then messes with the timing of one of those duplicates. It splits the signal in two, so you’ve got your original signal and then an identical copy.
The copy is then delayed by just a few milliseconds. We’re talking like 1-10ms here, it’s a super short delay. Short enough that you can’t consciously hear it, but it’s enough to mess with the timing.
The flanger uses an LFO (low-frequency oscillator) to constantly shift the timing of that delayed signal, moving it forward or backward in small increments. This means the delay is always changing, getting longer or shorter little by little.
When the flanger mixes the original signal back together with this timing-shifted copy. This interaction between the delayed and original signals makes peaks and dips in your frequency spectrum, called a comb filter. This is what gives you that super swooshy jet plane sound that flangers are known for.
The Difference Between Flanger and Phaser
As we mentioned earlier, a flanger uses a short delay and modulation to create its distinctive swooshy jet plane sound through a comb filter effect.
A phaser, on the other hand, also duplicates your guitar tone, but instead of delaying it, it runs one copy through multiple filters that shift the phase of different frequencies. When the phase-shifted signal is mixed back with the original, it creates notches in your tone. This results in a smoother, more subtle effect than a flanger.
To try and put it simply, a flanger’s sweep is more pronounced and metallic sounding, while a phaser’s sweep is gentler and smoother.
The History of Flanger
The history of the flanger is actually pretty interesting. It started way back in the 1940s. Legend has it the guitarist Les Paul, who you’ve probably heard of, came up with it by accident!
He and his sound engineer were playing around with two tape machines at the same time. They’d play the same recording on both, but slow one down a tiny bit. The result was that sweeping, whooshing flanger sound we all know and love today.
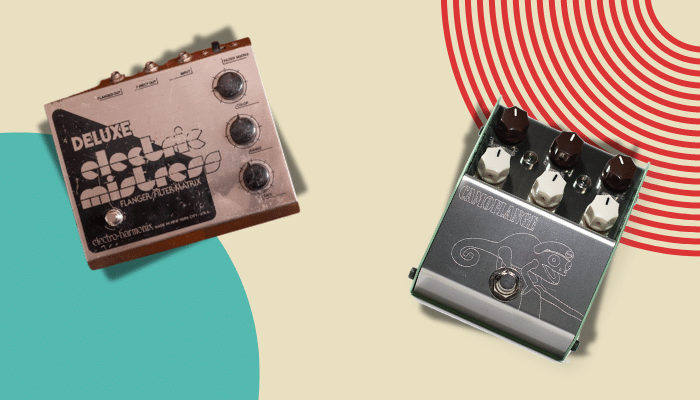
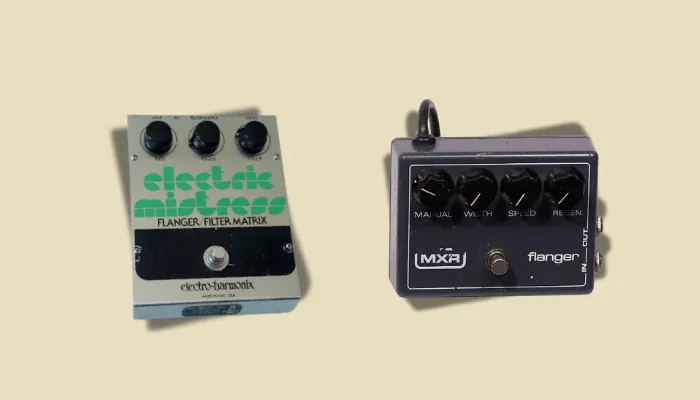
But it wasn’t until the mid-70s that the first real flanger pedals hit the market. Brands like Electro-Harmonix and MXR came out with early models like the Electric Mistress and MXR Flanger. This let guitarists get that flanger effect without needing two tape machines, which obviously isn’t too practical. The flanger effect really took off after that and ended up in a ton of famous songs that helped define whole genres of music.
Controls on a Flanger Pedal
Flanger pedals come with various controls that allow you to customize the sound to your liking. Here are some of the most common controls you’ll find on a flager pedal and what they do.
Note: In the following audio examples, I’m using a digital flanger. As a result the settings might be a lot more dramatic than you get on an analog flanger.
Rate
This control adjusts the speed of the sweeping effect, measured in Hertz (Hz), typically ranging from 0.1 Hz to 10 Hz. At a slow rate, the sweep moves gently, creating a dreamy, spacey sound. In contrast, a fast rate makes the sweep quick, making your guitar sound like it’s vibrating or shaking.
Audio Example: Rate 1 HZ
Audio Example: Rate 10HZ
Depth
The Depth control sets the intensity of the flanger effect, usually displayed as a percentage from 0 to 100%. A low-depth setting gives a subtle effect, adding a touch of movement to your sound, while a high-depth setting makes the effect stronger and more noticeable, ideal for dramatic sounds. The louder the depth gets, the more your affected signal rises; as such, it’s not normally a good idea to set the depth too high – although this is music, so do what you need to do.
Audio Example: Rate 1 HZ, Depth 30% (not going too high here, so it doesn’t get too weird)
Audio Example: Rate 1 HZ, Depth 5%
Feedback
This control adds regeneration to the effect by feeding part of the signal back through the pedal, making the sweep more pronounced and metallic. Low feedback results in a smoother, less intense effect, whereas high feedback creates a sharper, more cutting effect, perfect for achieving that jet plane-like whoosh.
Audio Example: Rate 1 HZ, Depth 5%, Feedback 63%
Audio Example: Rate 1 HZ, Depth 5%, Feedback 5%
Manual or Manual Tweak
This control allows you to adjust the phase shift manually, creating a static flanging effect where the sweep stays at a fixed point. It’s useful for achieving a specific flanger tone that doesn’t move, adding a unique texture to your playing.
Tape or Through-Zero Mode
Some flanger pedals feature a Tape or Through-Zero mode, providing a more authentic vintage flanging sound. This mode lets the delayed signal pass through the zero-degree phase point, making the effect sound richer and more organic, reminiscent of an old tape machine and adding a classic feel to your music.
Experimenting with these controls can help you find the perfect flanger sound for your style, whether you prefer a gentle wave or a powerful sweep.
Types of Flanger Pedals
Flanger pedals come in two main types: analog and digital. Each offers unique characteristics that cater to different playing styles and preferences.
Analog Flangers
Analog flangers use traditional electronics to create their sound. They’re known for their warm and natural tone. These pedals produce a rich, warm sound that many guitarists love, making them perfect for classic rock, blues, and any music with a desired vintage sound.
Analog flangers are generally straightforward to use, with simple controls that allow you to dial in a great sound without too much effort. Their organic sounds are ideal for creating natural-sounding sweeps and flanges.
However, analog flangers can be less versatile, lacking the extensive features found in digital pedals. Due to the delicate nature of analog circuits, they may also require more maintenance.
Digital Flangers
Digital flangers leverage modern technology to offer a wide range of effects and more precise control. These pedals can create many different sounds, from vintage to modern, making them suitable for genres like metal, pop, and electronic music.
Digital flangers often come with advanced features and settings, allowing for more flexibility and experimentation with different tones and effects.
While digital flangers provide more options and are generally more reliable, some guitarists feel they sound too clean or sterile. Additionally, the increased number of controls can make them more complex and harder to use for beginners.
How to Set up a Flanger Pedal
Flangers can really spice up your guitar playing, whether you want a subtle texture or a wild jet engine sound.
Try It Subtle
For something more mellow, start with low Rate and Depth settings. This gives you a gentle sweep that fills things out without being too obvious. Also, keep the Feedback down so it’s not too much. Strumming chords like this makes them sound bigger and more spacious, perfect for chill parts of a song.
Be Dramatic
Now, if you want your guitar really to stand out, try turning those knobs right up! High Rate and Depth gives you a strong sweeping effect. Max out the Feedback, and you’ve got that signature metallic jet plane vibe. Solo over that, and it’ll grab your audience’s attention.
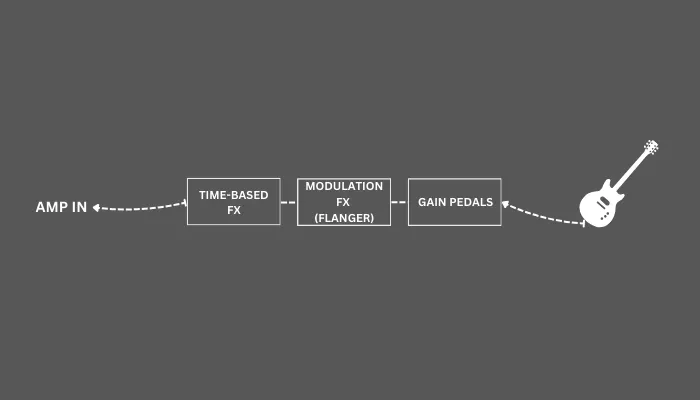
Where Should Flanger Go in The Pedal Chain?
The truth is, you should experiment and find what works for you. But here’s what I’ve found usually works.
Modulation effects like flanger really shine when they come after the drive section (distortion or overdrive) of your board. Putting it in that spot means the flanger effect can really cut through the dirt and you’ll hear all those whooshing tones nice and clear.
At the same time, you’ll want to place it before any delay or reverb. Those types of time-based effects sound best when they add some depth to the flanged sound, filling things out instead of muddying it up.
Famous Guitarists Who Use Flanger
A few iconic guitarists known for incorporating the flanger effect into their signature sounds include David Gilmour, Andy Summers, Eddie Van Halen, and Jimi Hendrix. Let’s have a look at how they used it.
David Gilmour
David Gilmour of Pink Floyd was renowned for his smooth yet expressive style. His guitar work on “So Far Away” features flanger for a sweeping, dreamy quality that makes the solo float through space.
Andy Summers
Andy Summers of The Police blended rock, reggae, and punk in a unique way. The intro to “Driven To Tears” uses flanger, creating a swirling riff that gives the song its signature movement and energy.
Eddie Van Halen
Eddie Van Halen was a true virtuoso known for explosive playing. He used flanger on “And the Cradle Will Rock…” to conjure a powerful jet plane-like sound that magnified the aggression of the riff.
Jimi Hendrix
Jimi Hendrix revolutionized guitar effects. On “Axis: Bold as Love,” flanger imbued his playing with a psychedelic, otherworldly texture that enhanced the dreamy vibe, though it was likely a studio effect rather than a pedal in his case.
These legends demonstrate flanger’s ability to shape tone and atmosphere in iconic ways. Their innovative uses of the effect left lasting marks on the music world.
Choosing the Right Flanger Pedal
Picking the right flanger pedal can significantly enhance your guitar tone. Here are some tips to help you find the perfect flanger pedal based on sound, features, and budget.
When choosing a flanger pedal, consider the following factors:
Sound Quality
Listen to demos and reviews to determine if the pedal produces the flanger sound you prefer. Some pedals offer a warmer, more vintage tone, while others might deliver a modern, clean sound.
Features
Evaluate the controls and options available. Decide whether you prefer simple controls or a pedal with extensive settings to tweak.
Budget
Flanger pedals come in various price ranges. Determine your budget and find a pedal that offers good value for your money.
Durability
Check the build quality. A sturdy pedal will last longer, especially if you plan to use it frequently or take it to gigs.
To Flange or Not to Flange
I wouldn’t want my pedalboard without a flanger pedal—they’re an invaluable tool for any guitarist. Flangers offer a wide range of sounds, from subtle sweeps to dramatic jet plane effects, adding depth and dimension to your playing.
Now it’s your turn to experiment. Try different settings on your flanger pedal, and place it at various points in your signal chain to see what unique sounds you can create. Whether you’re adding a subtle touch of texture to your chords or crafting wild, swirling solos, a flanger pedal can be a source of endless inspiration and new sonic possibilities.