
The Echoplex is a legendary analog tape delay unit from the 1960s. And it is a true icon in the world of vintage sound. Its warm, organic delay, enriched by natural tape saturation and subtle pitch modulations, has shaped countless recordings.
Many of us pedal players dream of owning an original Echoplex, but since it’s rare and expensive, I set out to recreate that magic using the modern Meris LVX Tape Delay. Here’s how I did it.
- Sound Examples
- Building Your Own Digital Echoplex
- Download the Ready-Made Preset
- Mapping Echoplex Controls to the Meris LVX
- Step-By-Step: Creating an Echoplex Tape Delay on the Meris LVX
- Bringing Vintage Tape Delay to the Meris LVX
Sound Examples
Here are six delay examples I recorded using this Echoplex preset for the Meris LVX. The exact settings for these samples are in the article 6 Echoplex Delay Settings for the Meris LVX.
Building Your Own Digital Echoplex
Before we discuss how I created my version of the Echoplex Tape Delay using the Meris LVX, I want to offer you a quick way to get started. At the end of this section, there’s a button to download the preset. You can then upload it directly to your Meris LVX. Easy.
But I recommend you don’t do this.
Follow along with this article and build the preset yourself. This way, you can tweak it to fit your personal style and truly understand the thinking behind each parameter.
By crafting the sound step by step, you’ll achieve a tone perfectly suited to your needs and gain a deeper understanding of how the Meris LVX works, making adjustments easy.
Download the Ready-Made Preset
If you just want to get going straight away, click the button below to download the ready-made preset. Otherwise, continue reading to learn how to make it and customize it to your own needs.
Steal my Echoplex preset
Don't fancy dialling it in by hand? Take mine. Drop your email, the preset's yours, and you're on Pedal Talk while you're at it: gear talk and first looks, every other week.
Free · Comes with Pedal Talk · Leave whenever
✓ You're in
It's right below. We've also fired a confirmation to your inbox.
Download it nowConfirm your inbox to lock in Pedal Talk.
Mapping Echoplex Controls to the Meris LVX
I wanted the Meris LVX to feel as much like an original Echoplex as possible. So I want to show you how each control on the Echoplex will correspond to the controls on the Meris LVX.
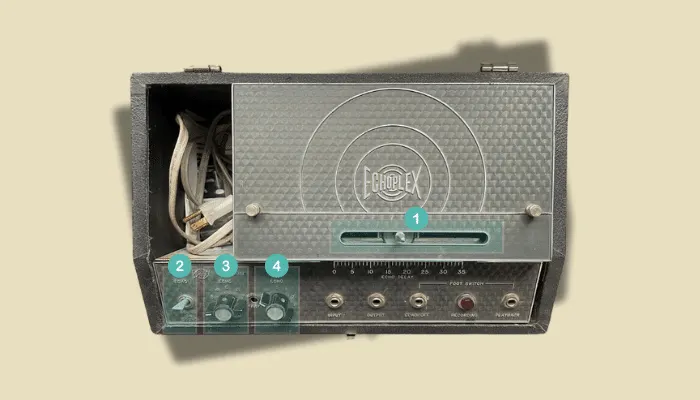
The controls on the original Echoplex are:
- Echo Delay (slider)
- Echo/Sound On Sound (toggle switch)
- Echo Sustain (knob)
- Echo Volume (knob)
Here’s how things line up from the primary Echoplex controls with those on the Meris LVX:
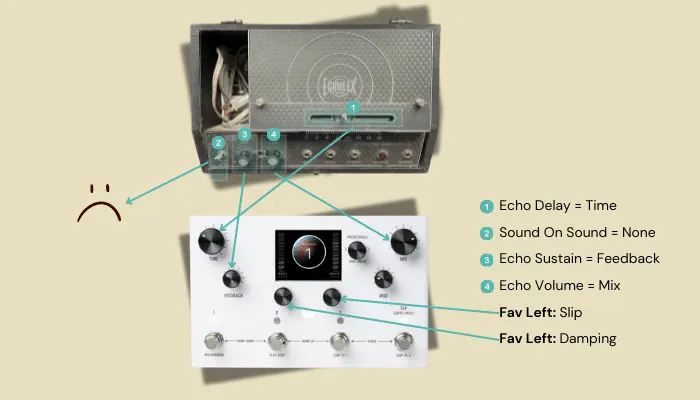
Echo Delay Slider = Time
The Time knob on the Meris LVX is your go-to for replicating the Echo Delay Slider on the Echoplex. This controls the delay time, letting you dial in anything from tight slapback echoes to expansive, atmospheric delays—just like the original Echoplex.
Echo Sustain = Feedback
The Feedback knob on the LVX mirrors the Echo Sustain control from the Echoplex. This adjusts how many repeats you get before the delay fades out, giving you control over the echo’s persistence. Whether you want a subtle tail or infinite repeats, the LVX’s Feedback knob delivers that classic Echoplex behavior.
Echo Volume = Mix
The Mix knob on the LVX handles the same job as the Echo Volume on the Echoplex. It balances the wet (delayed) signal with the dry signal, so you can decide how much the delay stands out in your overall sound. This control allows you to dial in your perfect mix, from a subtle layer to a dominant effect.
Echo – Sound on Sound
The original Echoplex had a unique Sound on Sound feature that continuously looped the delay signal, creating evolving soundscapes. I decided not to recreate this feature. I tried a couple of times and failed. But in the end, I didn’t see a use for it in my setup, so I focused on honing the core delay elements that I found most useful. If you can figure this one out, let me know!
My Extra Tweaks: Fav Preset Knobs on the Meris LVX
To make the delay even more versatile, I mapped two additional parameters to the Meris LVX Fav preset knobs. You might want to change these, but they seem pretty useful to me.
Left Fav Preset Knob = Damping
The Damping parameter controls the high-frequency roll-off in the delay repeats, simulating how tape delays naturally darken with each echo. I assigned this to the Left Fav preset knob for quick access, making it easy to adjust the tone of your repeats depending on the context.
Right Fav Preset Knob = Slip
The Slip parameter adjusts the amount of pitch modulation or “warble,” emulating the wow and flutter of vintage tape machines. By assigning this to the Right Fav preset knob, you can fine-tune the tape-like pitch variations with ease, adding just the right amount of vintage character to your delay.
Step-By-Step: Creating an Echoplex Tape Delay on the Meris LVX
Before You Start
Things you need to know:
- You’ll need a Meris LVX pedal.
- I’m using the Meris LVX PreEditor app, but you can follow along directly on the device using the text or graphic editor.
- Settings are adjusted to my preference. I’ve provided ranges for some parameters and my specific settings.
- No matter your experience level, feel free to tweak the parameters to suit your taste.
- If I don’t mention a parameter, I haven’t used or activated it.
- Digital delays rarely sound the same as tape delays. This Echoplex sound is no exception. I’ve done my best with it, and I think it’s awesome and close to the original sound. Learn more about the differences in Analog vs digital delay pedals.
1. Find and name a blank preset
Okay, let’s find a blank preset and get it ready for editing.
- In Meris prEDITOR find and select a blank preset. This can be in a Library or on the Live Device (it’s up to you).
- Enter a name for your preset. I’m using EchoplexPP.
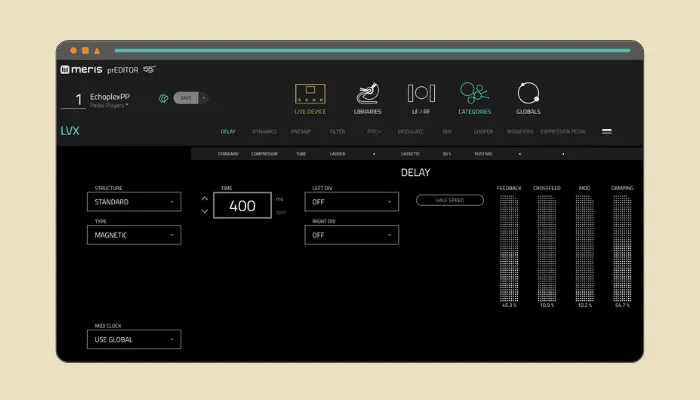
2. Creating the core delay
I chose the Magnetic Delay type to capture the essence of the Echoplex, which simulates the core characteristics of tape delays—those beautiful pitch variations, wow, and flutter. This setup is the foundation for crafting a delay that closely mimics the Echoplex.
Go to the Delay editor in either the PreEditor app or directly on your Meris LVX, and adjust the following.
Settings:
- Structure: Standard
- Type: Magnetic
- Time: 400 ms (Adjust this with the LVX time knob based on your delay needs; it can be easily changed later.)
- Half Speed: Off
- Left Div/Right Div: Off
- Feedback: 45.3% (Experiment with 40-60% for balanced repeats.)
- Crossfeed: 10.9% (Try 10-30% for subtle stereo widening.)
- Mod: 10.2% (Experiment with 10-20% for subtle movement.)
- Damping: 54.7% (Try between 40-60% to roll off high frequencies progressively with each repeat).
- Midi Clock: Use Global.
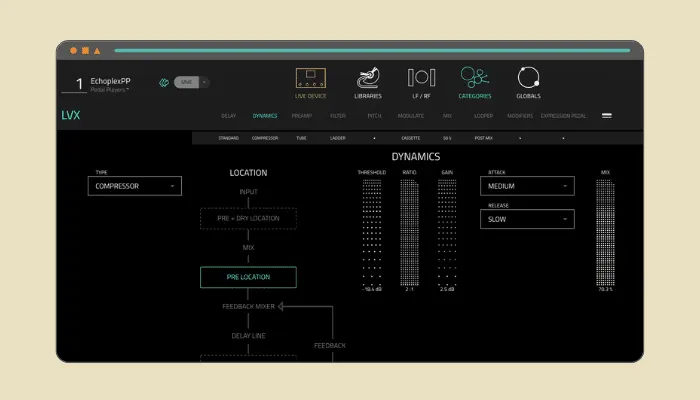
3. Adding dynamics with a tape-style compression
One key characteristic that makes the Echoplex so special is its natural compression as the tape saturates, creating a warm and cohesive sound. To replicate this effect on the Meris LVX, I used a compressor to introduce that signature tape-style compression.
Go to the Dynamics editor in the PreEditor app or directly on your Meris LVX, and adjust the following.
Settings:
- Type: Compressor
- Location: Pre Location (labeled as PRE on the Meris LVX interface)
- Threshold: -20 dB to -15 dB
- Ratio: 2:1 (Experiment with 2:1 to 3:1)
- Gain: 2.5 dB (Try between 2-5 dB)
- Attack: Medium (Experiment with medium and fast)
- Release: Slow
- Mix: 70.3% (Experiment with 60%-80%)
These settings gently smooth out the dynamic range, adding warmth without over-compressing the signal. The result is a delay that feels cohesive and well-rounded, much like the original Echoplex.
4. Adding some vintage warmth with a preamp
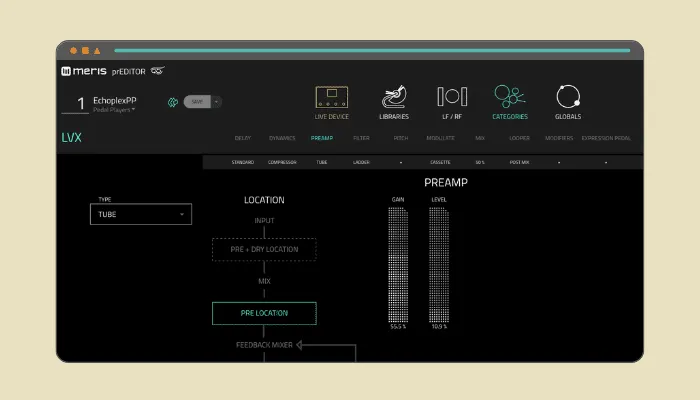
The Echoplex’s preamp is legendary for the coloration it adds to the sound. To bring that character into the Meris LVX, I chose to use a Tube Preamp.
Go to the Preamp editor in the PreEditor app or directly on your Meris LVX, and adjust the following.
Settings:
- Type: Tube.
- Location: Pre Location (labeled as PRE on the Meris LVX interface).
- Gain: 55.5% (Experiment between 50-70%).
- Level: 10.9% (Adjust this for unity gain).
I found these settings add just the right amount of harmonic distortion and warmth, making the delay signal feel rich and tube-driven, just like the Echoplex. The key is finding that sweet spot in the gain, where the saturation enhances the sound without overwhelming it. Spend some time to ensure you get this where you like it.
5. Shaping the tone to recreate the darkness of tape
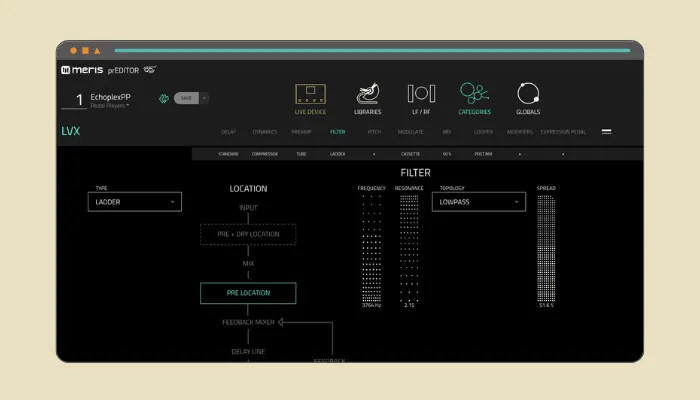
One of the most distinctive features of tape delays is how the high frequencies gradually roll off with each repeat. To try and match this, I used a Ladder Filter in the feedback loop.
Go to the Filter editor in the PreEditor app or directly on your Meris LVX, and adjust the following.
Settings:
- Type: Ladder.
- Location: Feedback Loop.
- Frequency: 3764 Hz (Try between 3000-5000 Hz).
- Resonance: 2.15 (Experiment between 2-4).
- Topology: Lowpass.
- Spread: 10.2% (Experiment between 10-20%).
A great feature of the Meris LVX tape delay is its ability to place the filter in the feedback loop. This allowed me to make each repeat get progressively darker, capturing that smooth, vintage decay we all associate with classic tape delays.
6. Adding some imperfect tape wobble
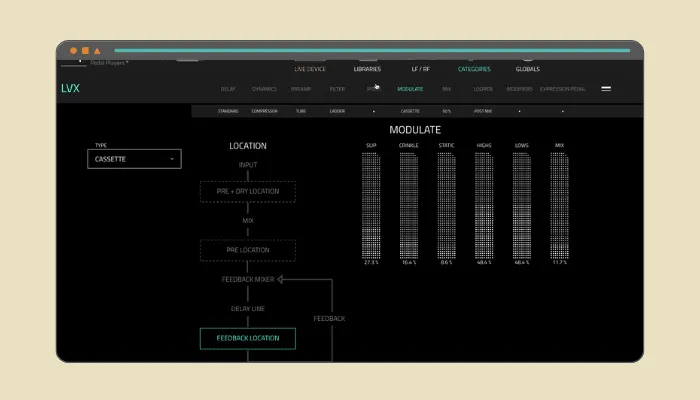
The final touches were the natural modulation and imperfections of the tape. This is done somewhat with the Magnetic delay type, but I wanted to take it one step further, so I added a Cassette modulation.
Go to the Modulate editor in the PreEditor app or directly on your Meris LVX, and adjust the following settings:
Settings:
- Type: Cassette.
- Location: Feedback Location.
- Slip: 27.3% (Experiment with 20-40%).
- Crinkle: 16.4% (Try between 10-30%).
- Static: 8.6% (Try between 5-15%).
- Highs/Lows: 48.4% (You can set these individually if you’d like, and try between 40-60%).
- Mix: 11.7% (I like this more subtle, but experiment between 10-40%)
I love the Slip**,** as it added those slight pitch variations that make tape delays so charming. The Crinkle and Static were also useful in introducing some subtle texture, simulating the wear and tear of physical tape. This gave the delay a layer of authenticity, making it feel a little less digital and more analog.
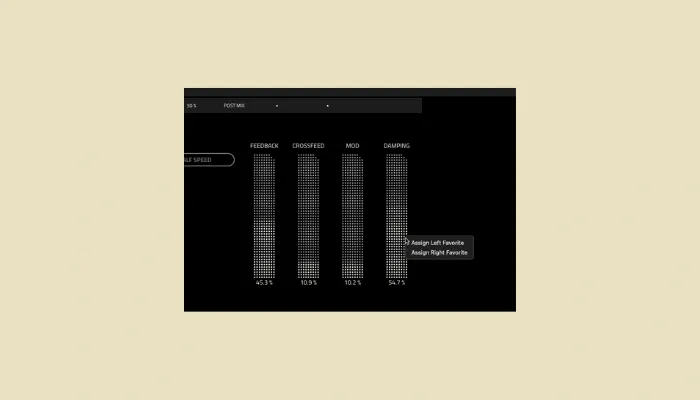
7. Adding quick access parameters
For flexibility during live performances or quick adjustments at home or in the studio, I assigned two parameters to easy-access knobs:
- Damping: To quickly alter the brightness of the repeats.
- Cassette Slip: For on-the-fly control over the amount of tape-like warble.
These tweaks make it easy to adjust the delay to different musical contexts without diving deep into settings every time.
To do this:
In prEDITOR, Find the settings and right-click on them. Depending on your preferences, select Assign Left Favorite or Assign Right Favorite.
In Graphic View: Hold down knob C1 or C2 (the knobs left and right directly below the display) to assign the current parameter.
In Text View: Hold down knob C1 or C2 (the knobs left and right directly below the display), then turn the parameter you’d like to assign up and down in the Edit Page.
Some additional settings I didn’t change
There are a couple of extra settings you might be wondering about, so I decided to include this section to clarify things. Anything else not mentioned has not been changed.
On the Mix section:
- Mix: 50%.
- Dry trim: 0%.
- Wet trim: 0%.
On the Looper section:
- I don’t use the looper at all. But feel free to set this up however you like.
Modifiers:
- I didn’t use any modifiers.
Expression pedal:
- I didn’t change anything here.
Bringing Vintage Tape Delay to the Meris LVX
Trying to recreate the Echoplex analog delay as an Echoplex digital delay required a lot more than just picking a Meris LVX tape delay model.
By carefully layering compression, preamp warmth, filtering, and modulation, I (or WE if you followed the instructions) have created a delay that captures the warmth, character, and imperfections of the original Echoplex.
I hope you learned a little about the Meris LVX here, but most importantly, I hope you can use these new creations to create some great music and sounds. Feel free to reach out and send me some of the tones you manage to make, I’d love to hear it.